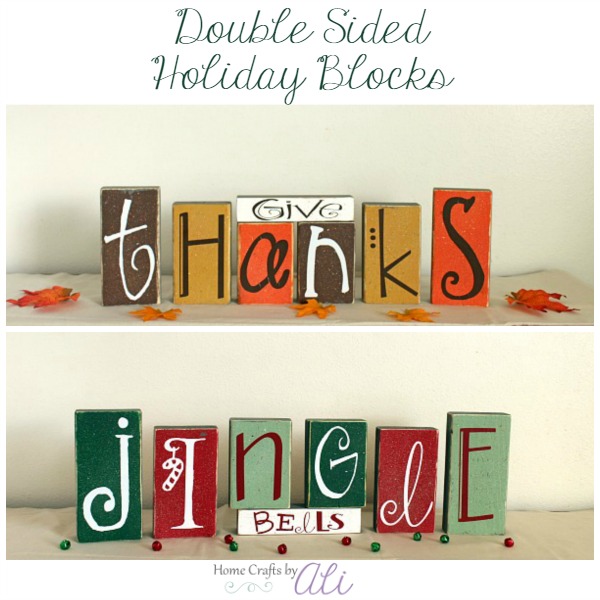
Generally for my tutorials I share step by step photos, but I made these blocks 3 years ago and I was so busy chatting with friends that I don't have photos from that night. I will describe it so you can easily make the blocks for your own home. If you decide to make this project, plan on a large chunk of time. You will need to let the paint dry for a while before going on to each next steps.
Supplies needed:
***Some of the following are affiliate links. If you decide to purchase one of the linked items, I will receive a small portion, which will help support some of the expenses for this blog. Thanks! ***
One 2x4 from a home improvement store
One 2x2 from a home improvement store
Miter saw
Vinyl letters
fine sandpaper
Acrylic Paint
Toothbrush
vinyl cutting machine (optional)
Instructions:
1. You will need to design your letters yourself if you own a vinyl cutting machine. If you don't own a machine that cuts vinyl, you can ask in Indoor Yard Sale sites on Facebook to see if someone can design and cut the vinyl for you. That is what I did for these because at the time I didn't own my Cricut machine.
2. The wood comes in 6 ft or 8 ft lengths, so you will need to use a miter saw to cut them down to the size you need. The block letters are all 2x4 pieces of wood that have been cut. The largest are 7-inch, the next smaller size is 6-inch, and the two center blocks are 5-inch. The small word 2x2 block is 7 inches long. Save the leftover wood to make more blocks as a gift or for a future project.
3. Sand your blocks and paint them. I advise you to paint the edge sides first. I used a gray color, but I think that white would look best.
4. Next you will paint the large flat side of the block where the letters will go. I used three different colors for each side of the blocks. For the Thanksgiving side I used orange, dark brown, and a yellow-gold color. For the Christmas side I used a mint green, hunter green, and sleigh red. For the small block I painted all sides white. I generally use Plaid Apple Barrel brand paint because I like the consistency and the choice of colors. you can buy those at your local JoAnn store ($1.69) or Walmart (.50).
5. Use the fine sandpaper to lightly sand the corner edges that have been painted. You don't want to remove all of the paint, just make it look a little worn or distressed.
6. If you look closely at the blocks, they have little flecks of paint on them. I did this by dipping the bristles of a toothbrush in paint and running my thumb along the bristles to splatter the paint onto the blocks. I used the same 3 colors of paint that I used on the blocks, but alternated which colored blocks they were on so the splatters showed up nicely against the background color.
7. The last step is applying the vinyl lettering to the blocks. Remove the backing off of the vinyl letters. The letters will still be attached to the transfer paper. Carefully put the letters in the center of the block. You want to make sure they are smooth and there are no bubbles in the vinyl.
8. Remove the transfer paper and inspect the vinyl lettering. If there are bubbles, try to gently remove the letters to smooth it out. If that doesn't work, you can take a safety pin and poke a very small hole into the bubble. That will let the air escape and it won't look bubbled anymore.
There you have your finished project! You can decorate for Thanksgiving and Christmas with the same blocks.
I hope you like these blocks as much as we do at our house. What are your favorite holiday decorations?


This looks super cute, I love these! I wish I had space for them in my tiny apartment!
ReplyDeleteThanks for visiting Samantha! These blocks do take up a bit of space. We just got our piano so I was able to display them for the first time!
Deletethse are SO cute and crafty!! I love how easy it makes decorating!
ReplyDeleteIt does make it easy! People that visit love them too. =)
DeleteI love these! I have some random wood scraps laying around and maybe ill so this with them! Thanks for the idea!
ReplyDeleteThank you Samantha! I'm glad this gave you an idea for holiday decorating. I'd love to see how yours turn out!
DeleteLove these! I saw them the other day with your runner and was wondering if you made them. Are you going to make them for your shop?
ReplyDeleteThanks Kim! I don't think I will make them for my shop. They would be expensive to ship and take quite a bit of time to make.
DeleteThat's true..did not think about the shipping. They are cute though!
DeleteThese are so fun! Love it. Thanks so much for sharing them with us at the Tips & Tricks linky party. I've pinned them.... This is a craft I CAN DO! :)
ReplyDeleteGlad that you liked them Heather! Thanks for pinning too. =)
Delete